326
11

If you're living your life right, you probably know what as MOSFET is. But do you know the MESFET? They are like the faster, uninsulated, Schottky version of a MOSFET, and they used to rule the roost in radio-frequency (RF) silicon. But if you're like us, and you have never heard of a MESFET, then give this phenomenal video by [Asianometry] a watch. In it, among other things, he explains how the shrinking feature size in CMOS made RF chips cheap, which brought you the modern cellphone as we know it.

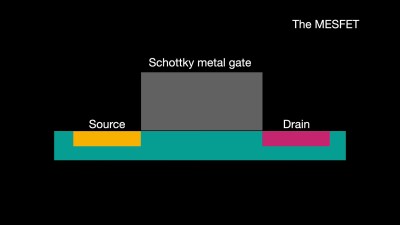
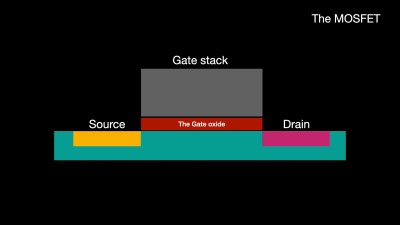
The basic overview is that in the 1960s, most high-frequency stuff had to be done with discrete parts because the bipolar-junction semiconductors of the time were just too slow. At this time, MOSFETs were just becoming manufacturable, but were even slower still. The MESFET, without its insulating oxide layer between the metal and the silicon, had less capacitance, and switched faster. When silicon feature sizes got small enough that you could do gigahertz work with them, the MESFET was the tech of choice.

As late as the 1980s, you'd find MESFETs in radio devices. At this time, the feature size of the gates and the thickness of the oxide layer in MOSFETs kept them out of the game. But as CPU manufacturers pushed CMOS theses features smaller, not only did we get chips like the 8086 and 80386, two of Intel's earliest CMOS designs, but the tech started getting fast enough for RF. And the world never looked back.

If you're interested in the history of the modern monolithic RF ICs, definitely give the 18-minute video a watch. (You can skip the first three or so if you're already a radio head.) If you just want to build some radio circuits, this fantastic talk from [Michael Ossmann] at the first-ever Supercon will make you an RF design hero. His secrets? Among them, making the most of exactly these modern everything-in-one-chip RF ICs so that you don't have to think about that side of things too hard.

Thanks [Stephen] for the tip!


From Blog – Hackaday via this RSS feed

327
16

Multifunctional USB controlled PCB on blue background

Meet the little board that could: [alcor6502]'s tiny USB relay controller, now evolved into a multifunction marvel. Originally built as a simple USB relay to probe the boundaries of JLCPCB's production chops, it has become a compact utility belt for any hacker's desk drawer. Not only has [alcor6502] actually built the thing, he even provided intstructions. If you happened to be at Hackaday in Berlin, you now might even own one, as he handed out twenty of them during his visit. If not, read on and build it yourself.

This thing is not just a relay, and that is what makes it special. Depending on a few solder bridges and minimal components, it shape-shifts into six different tools: a fan controller (both 3- and 4-pin!), servo driver, UART interface, and of course, the classic relay. It even swaps out a crystal oscillator for USB self-sync using STM32F042's internal RC - no quartz, less cost, same precision. A dual-purpose BOOT0 button lets you flash firmware and toggle outputs, depending on timing. Clever reuse, just like our mothers taught us.

It's the kind of design that makes you want to tinker again. Fewer parts. More function. And that little smile when it just works. If this kind of clever compactness excites you too, read [alcor6502]'s build log and instructions here.


From Blog – Hackaday via this RSS feed

328
7

3D scanning is becoming much more accessible, which means it's more likely that the average hacker will use it to solve problems -- possibly odd ones. That being the case, a handy tool to have in one's repertoire is a way to work with point clouds. We'll explain why in a moment, but that's where CloudCompare comes in (GitHub).

Not all point clouds are destined to be 3D models. A project may call for watching for changes in a surface, for example.

CloudCompare is an open source tool with which one can load up and do various operations on point clouds, including generating mesh models from them. Point clouds are what 3D scanners create when an object is scanned, and to become useful, those point clouds are usually post-processed into 3D models (specifically, meshes) like an .obj or .stl file.

We've gone into detail in the past about how 3D scanning works, what to expect from it, and taken a hands-on tour of what an all-in-one wireless scanner can do. But what do point clouds have to do with getting the most out of 3D scanning? Well, if one starts to push the boundaries of how and to what purposes 3D scanning can be applied, it sometimes makes more sense to work with point clouds directly instead of the generated meshes, and CloudCompare is an open-source tool for doing exactly that.

For example, one may wish to align and merge two or more different clouds, such as from two different (possibly incomplete) scans. Or, you might want to conduct a deviation analysis of how those different scans have changed. Alternately, if one is into designing wearable items, it can be invaluable to be able to align something to a 3D scan of a body part.

It's a versatile tool with numerous tutorials, so if you find yourself into 3D scanning but yearning for more flexibility than you can get by working with the mesh models -- or want an alternative to modeling-focused software like Blender -- maybe it's time to work with the point clouds directly.


From Blog – Hackaday via this RSS feed

329
7

Usually when we talk about retrocomputing, we want to look at -- and in -- some old hardware. But [Z→Z] has a different approach: dissecting MacPaint, the Apple drawing program from the 1980s.

While the program looks antiquated by today's standards, it was pretty hot stuff back in the day. Things we take for granted today were big deals at the time. For example, being able to erase a part of something you drew prompted applause at an early public demo.

We enjoyed the way the program was tested, too. A software "monkey" was made to type keys, move things, and click menus randomly. The teardown continues with a look inside the Pascal and assembly code with interesting algorithms like how the code would fill an area with color.

The program has been called "beautifully organized," and [Z→Z] examines that assertion. Maybe the brilliance of it has been overstated, but it did work and it did influence many computer graphics programs over the years.

We love digging through old source code. Even old games. If you do your own teardowns, be sure to send us a tip.


From Blog – Hackaday via this RSS feed

330
4

[Antoine Pirrone] and [Grégoire Passault] are making a DIY miniature re-imagining of Disney's BDX droid design, and while it's still early, there is definitely a lot of progress to see. Known as the Open Duck Mini v2 and coming in at a little over 40 cm tall, the project is expected to have a total cost of around 400 USD.

The inner workings of Open Duck Mini use a Raspberry Pi Zero 2W, hobby servos, and an absolute-orientation IMU.

Bipedal robots are uncommon, and back in the day they were downright rare. One reason is that the state of controlled falling that makes up a walking gait isn't exactly a plug-and-play feature.

Walking robots are much more common now, but gait control for legged robots is still a big design hurdle. This goes double for bipeds. That brings us to one of the interesting things about the Open Duck Mini v2 : computer simulation of the design is playing a big role in bringing the project into reality.

It's a work in progress but the repository collects all the design details and resources you could want, including CAD files, code, current bill of materials, and links to a Discord community. Hardware-wise, the main work is being done with very accessible parts: Raspberry Pi Zero 2W, fairly ordinary hobby servos, and an BNO055-based absolute orientation IMU.

So, how far along is the project? Open Duck Mini v2 is already waddling nicely and can remain impressively stable when shoved! (A "testing purposes" shove, anyway. Not a "kid being kinda mean to your robot" shove.)

Check out the videos to see it in action, and if you end up making your own, we want to hear about it, so remember to send us a tip!


From Blog – Hackaday via this RSS feed

331
5
8 Pins For Linux (hackaday.com)

We've seen a Linux-based operating system made to run on some widely varying pieces of hardware over the years, but [Dimity Grinberg]'s latest project may be one of the most unusual. It's a PCB with 3 integrated circuits on it which doesn't seem too interesting at first, but what makes it special is that all three of those chips are in 8-pin SOIC packages. How on earth can Linux run on 8-pin devices? The answer lies as you might expect, in emulation.

Two of the chips are easy to spot, a USB-to-serial chip and an SPI RAM chip. The processor is an STM32G0 series device, which packs a pretty fast ARM Cortex M0+ core. This runs a MIPS emulator that we've seen on a previous project, which is ripe for overclocking. At a 148 MHz clock it's equivalent to a MIPS running at about 1.4 MHz, which is just about usable. Given that the OS in question is a full-featured Debian, it's not running some special take on Linux for speed, either.

We like some of the hardware hacks needed to get serial, memory, and SD card, onto so few pins. The SD and serial share the same pins, with a filter in place to remove the high-frequency SPI traffic from the low-frequency serial traffic. We're not entirely sure what use this machine could be put to, but it remains an impressive piece of work.


From Blog – Hackaday via this RSS feed

332
22

If you flew or drove anything remote controlled until the last few years, chances are very good that you’d be using some faceless corporation’s equipment and radio protocols. But recently, open-source options have taken over the market, at least among the enthusiast core who are into squeezing every last bit of performance out of their gear. So why not take it one step further and roll your own complete system?

Apparently, that’s what [Malcolm Messiter] was thinking when, during the COVID lockdowns, he started his own RC project that he’s calling LockDownRadioControl. The result covers the entire stack, from the protocol to the transmitter and receiver hardware, even to the software that runs it all. The 3D-printed remote sports a Teensy 4.1 and off-the-shelf radio modules on the inside, and premium FrSky hardware on the outside. He’s even got an extensive folder of sound effects that the controller can play to alert you. It’s very complete. Heck, the transmitter even has a game of Pong implemented so that you can keep yourself amused when it’s too rainy to go flying.

Of course, as we alluded to in the beginning, there is a healthy commercial infrastructure and community around other open-source RC projects, namely ExpressLRS and OpenTX, and you can buy gear that runs those software straight out of the box, but it never hurts to have alternatives. And nothing is easier to customize and start hacking on than something you built yourself, so maybe [Malcolm]’s full-stack RC solution is right for you? Either way, it’s certainly impressive for a lockdown project, and evidence of time well spent.

Thanks [Malcolm] for sending that one in!


Posted from Blog – Hackaday RSS Feed: https://hackaday.com/blog/feed/ About / feedback: !meta@rss.ponder.cat

333
20

We remember when the transputer first appeared. Everyone "knew" that it was going to take over everything. Of course, it didn't. But [Oscar Toledo G.] gives us a taste of what life could have been like with a JavaScript emulator for the transputer, you can try in your browser.

If you don't recall, the transputer was a groundbreaking CPU architecture made for parallel processing. Instead of giant, powerful CPUs, the transputer had many simple CPUs and a way to chain them all together. Sounds great, but didn't quite make it. However, you can see the transputer's influence on CPUs even today.

Made to work with occam, the transputer was built from the ground up for concurrent programming. Context switching was cheap, along with simple message passing and hardware scheduling.

The ersatz computer has a lot of messages in Spanish, but you can probably muddle through if you don't hablar español. We did get the ray tracing example to work, but it was fairly slow.

Want to know more about the CPU? We got you. Of course, these days, you can emulate a transputer with nearly anything and probably outperform the original. What we really want to see is a GPU emulation.


Posted from Blog – Hackaday RSS feed, see !meta@rss.ponder.cat

334
9

[Morten] works very fast. He has already designed, fabbed, populated, and tested a breakout board for the new tiniest microcontroller on the market, and he’s even made a video about it, embedded below.

You might have heard about this new TI ARM Cortex MO micro on these very pages, where we asked you what you’d do with this grain-of-rice-sized chunk of thinking sand. (The number one answer was “sneeze and lose it in the carpet”.)

From the video, it looks like [Morten] would design a breakout board using Kicad 8, populate it, get it blinking, and then use its I2C lines to make a simple digital thermometer demo. In the video, he shows how he worked with the part, from making a custom footprint to spending quite a while nudging it into place before soldering it carefully down.

But he nailed it on the first try, and honestly it doesn’t look nearly as intimidating as we’d feared, mostly because of the two-row layout of the balls. It actually looks easy enough to fan out. Because you can’t inspect the soldering work underneath the chip, he broke out all of the lines to a header to make it quick to check for shorts between those tiny little balls. Smart.

We love to see people trying out the newest hotness. Let us know down in the comments what new parts you’re trying out.

Thanks [Clint] for the tip!


Posted from Blog – Hackaday RSS feed, see !meta@rss.ponder.cat

335
5

If you’re on the US East Coast, you should head on over to Wall, NJ and check out the Vintage Computer Festival East. After all, [Brian Kernighan] is going to be there. Yes, that [Brian Kernighan].

Events are actually well underway, and you’ve already missed the first few TRS-80 Color Computer programming workshops, but rest assured that they’re going on all weekend. If you’re from the other side of the retrocomputing fence, namely the C64 side, you’ve also got a lot to look forward to, because the theme this year is “The Sounds of Retro” which means that your favorite chiptune chips will be getting a workout.

[Tom Nardi] went to VCF East last year, so if you’re on the fence, just have a look at his writeup and you’ll probably hop in your car, or like us, wish you could. If when you do end up going, let us know how it was in the comments!


Posted from Blog – Hackaday RSS feed, see !meta@rss.ponder.cat

336
4

Posted from this RSS feed via bot, see !meta@rss.ponder.cat

337
3

Posted from this RSS feed via bot, see !meta@rss.ponder.cat

338
12

Posted from this RSS feed via bot, see !meta@rss.ponder.cat

339
4

Posted from this RSS feed via bot, see !meta@rss.ponder.cat

340
12

Posted from this RSS feed via bot, see !meta@rss.ponder.cat

341
4

Posted from this RSS feed via bot, see !meta@rss.ponder.cat

342
8

Posted from this RSS feed via bot, see !meta@rss.ponder.cat

343
19

Posted from this RSS feed via bot, see !meta@rss.ponder.cat

344
5

Posted from this RSS feed via bot, see !meta@rss.ponder.cat

345
12

Posted from this RSS feed via bot, see !meta@rss.ponder.cat

346
5

Posted from this RSS feed via bot, see !meta@rss.ponder.cat

347
2
Ditto That (hackaday.com)

Posted from this RSS feed via bot, see !meta@rss.ponder.cat

348
4

Posted from this RSS feed via bot, see !meta@rss.ponder.cat

349
7

Posted from this RSS feed via bot, see !meta@rss.ponder.cat

350
7

Posted from this RSS feed by RSSBot, see !meta@rss.ponder.cat

view more: ‹ prev next ›

Hackaday

316 readers
72 users here now

Fresh hacks every day

founded 9 months ago
MODERATORS