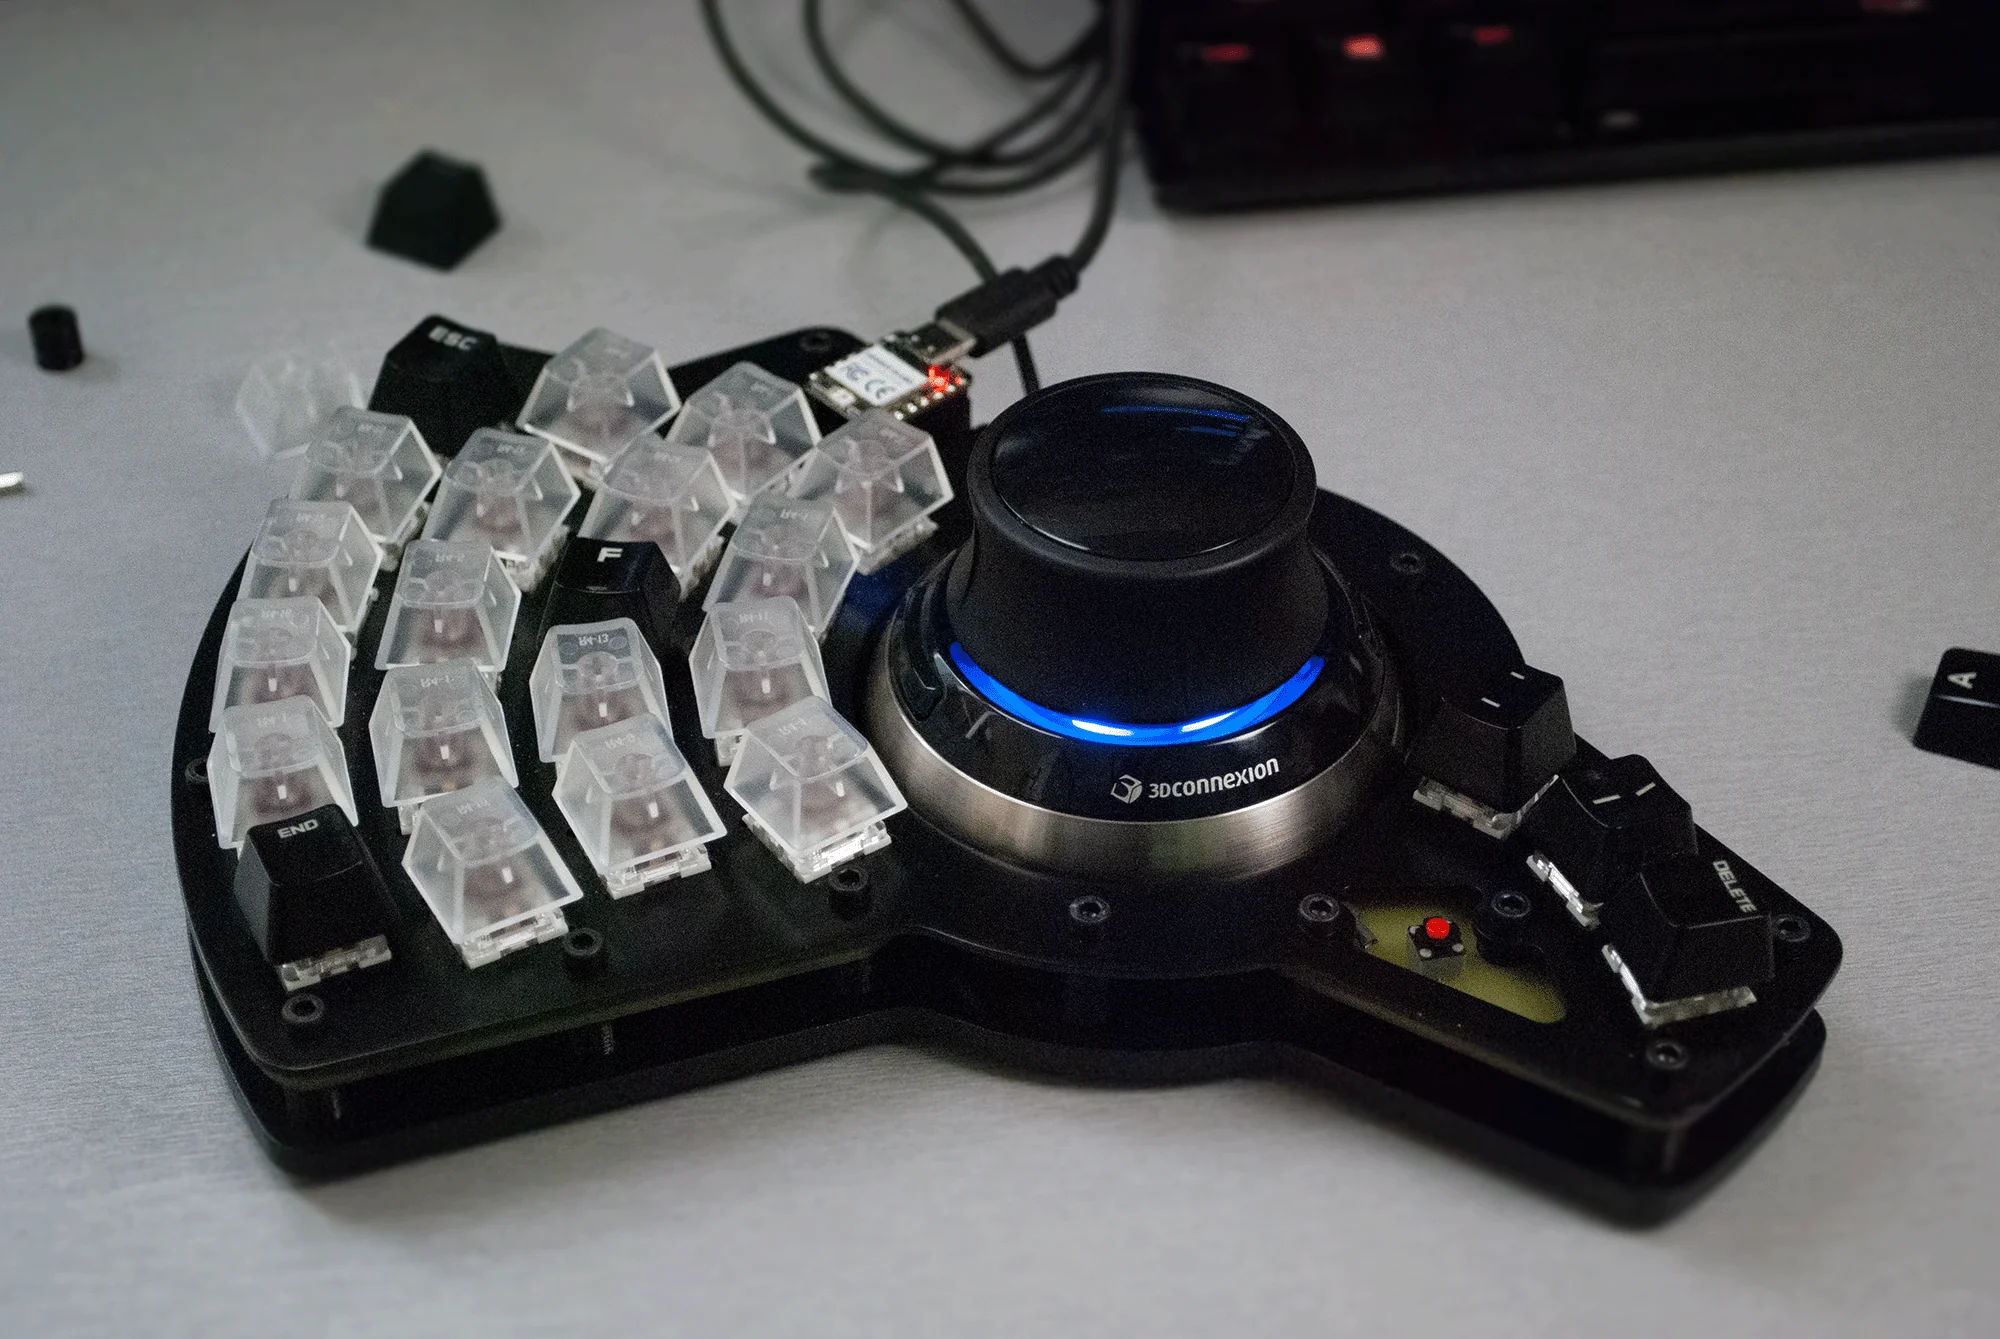
If you do a lot of 3D computer work, I hear a Spacemouse is indispensable. So why not build a keyboard around it and make it a mouse-cropad?
Image by [DethKlawMiniatures] via redditThat’s exactly what [DethKlawMiniatures] did with theirs. This baby is built with mild steel for the frame, along with some 3D-printed spacers and a pocket for the Spacemouse itself to live in.
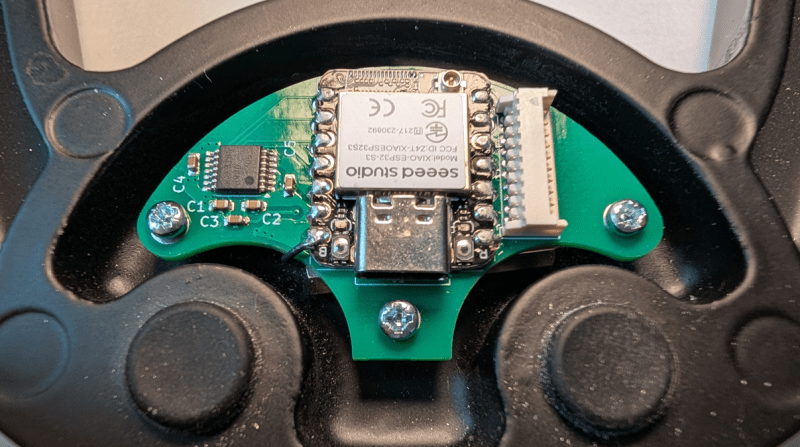
Those switches are Kailh speed coppers, and they’re all wired up to a Seeed Xiao RP2040. [DethKlawMiniatures] says that making that lovely PCB by hand was a huge hassle, but impatience took over.
After a bit of use, [DethKlawMiniatures] says that the radial curve of the macro pad is nice, and the learning curve was okay. I think this baby looks fantastic, and I hope [DethKlawMiniatures] gets a lot of productivity out of it.
Kinesis Rides Again After 15 Years
Fifteen years ago, [mrmarbury] did a lot of ergo keyboard research and longed for a DataHand II. Once the sticker shock wore off, he settled on a Kinesis Advantage with MX browns just like your girl is typing on right now.
Image by [mrmarbury] via redditNot only did [mrmarbury] love the Kinesis to death, he learned Dvorak on it and can do 140 WPM today. And, much like my own experience, the Kinesis basically saved his career.
Anyway, things were going gangbusters for over a decade until [mrmarbury] spilled coffee on the thing. The main board shorted out, as did a thumb cluster trace. He did the Stapelberg mod to replace the main board, but that only lasted a little while until one of the key-wells’ flex boards came up defective. Yadda yadda yadda, he moved on and eventually got a Svalboard, which is pretty darn close to having a DataHand II.
But then a couple of months ago, the Kinesis fell on [mrmarbury]’s head while cleaning out a closet and he knew he had to fix it once and for all. He ripped out the flex boards and hand-wired it up to work with the Stapelberg mod. While the thumb clusters still have their browns and boards intact, the rest were replaced with Akko V3 Creme Blue Pros, which sound like they’re probably pretty amazing to type on. So far, so good, and it has quickly become [mrmarbury]’s favorite keyboard again. I can’t say I’m too surprised!
The Centerfold: Swingin’ Bachelor Pad
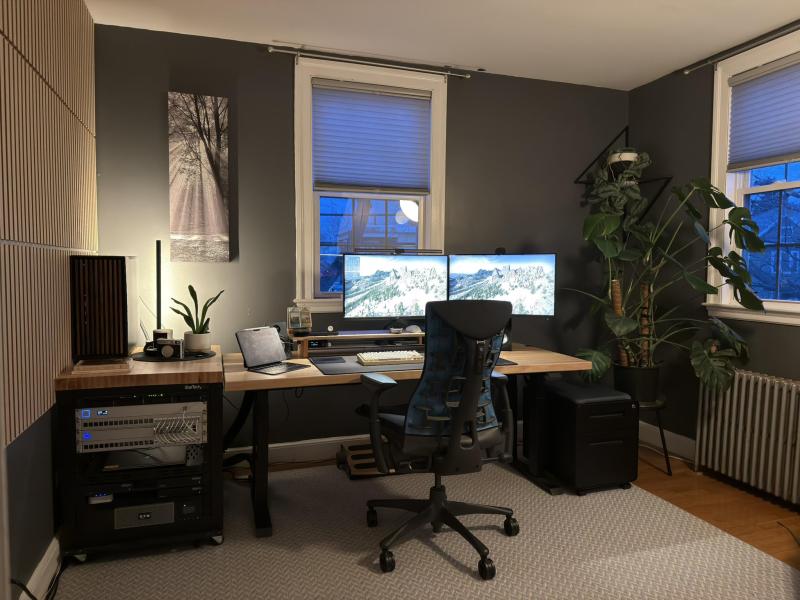
Image by [weetek] via redditIsn’t this whole thing just nice? Yeah it is. I really like the lighting and the monster monstera. The register is cool, and I like the way it the panels on the left wall mimic its lines. And apparently that is a good Herman Miller chair, and I dig all the weird plastic on the back, but I can’t help but think this setup would look even cleaner with an Aeron there instead. (Worth every penny!)
Do you rock a sweet set of peripherals on a screamin’ desk pad? Send me a picture along with your handle and all the gory details, and you could be featured here!
Historical Clackers: the IBM Selectric Composer
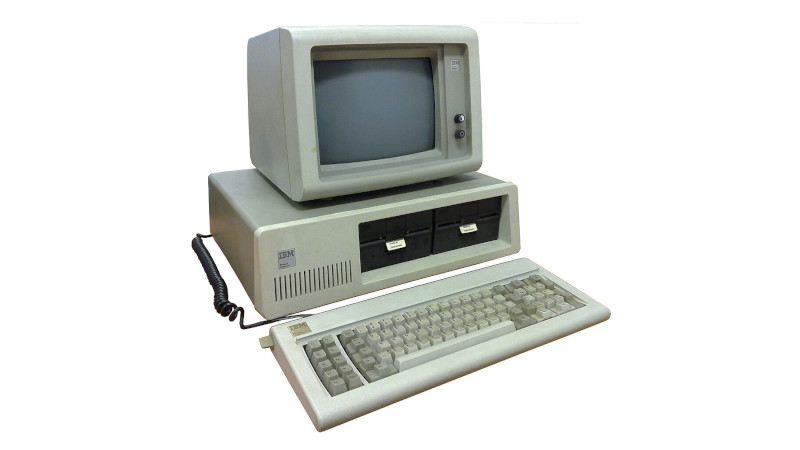
And what do we have here? This beauty is not a typewriter, exactly. It’s a typesetter. What this means is that, if used as directed, this machine can churn out text that looks like it was typeset on a printing press. You know, with the right margin justified.
Image by [saxifrageous] via redditYou may be wondering how this is achieved at all. It has to do with messing with the kerning of the type — that’s the space between each letter. The dial on the left sets the language of the type element, while the one one the right changes the spacing. There’s a lever around back that lets you change the pitch, or size of the type. The best part? It’s completely mechanical.
To actually use the thing, you had to type your text twice. The first time, the machine measured the length of the line automatically and then report a color and number combination (like red-5) which was to be noted in the right margin.
The IBM Selectric Composer came out in 1966 and was a particularly expensive machine. Like, $35,000 in 2025 money expensive. IBM typically rented them out to companies and then trashed them when they came back, which, if you’re younger than a certain vintage, is why you’ve probably never seen one before.
If you just want to hear one clack, check out the short video below of a 1972 Selectric Composer where you can get a closer look at the dials. In 1975, the first Electronic Selectric Composer came out. I can’t even imagine how much those must have cost.
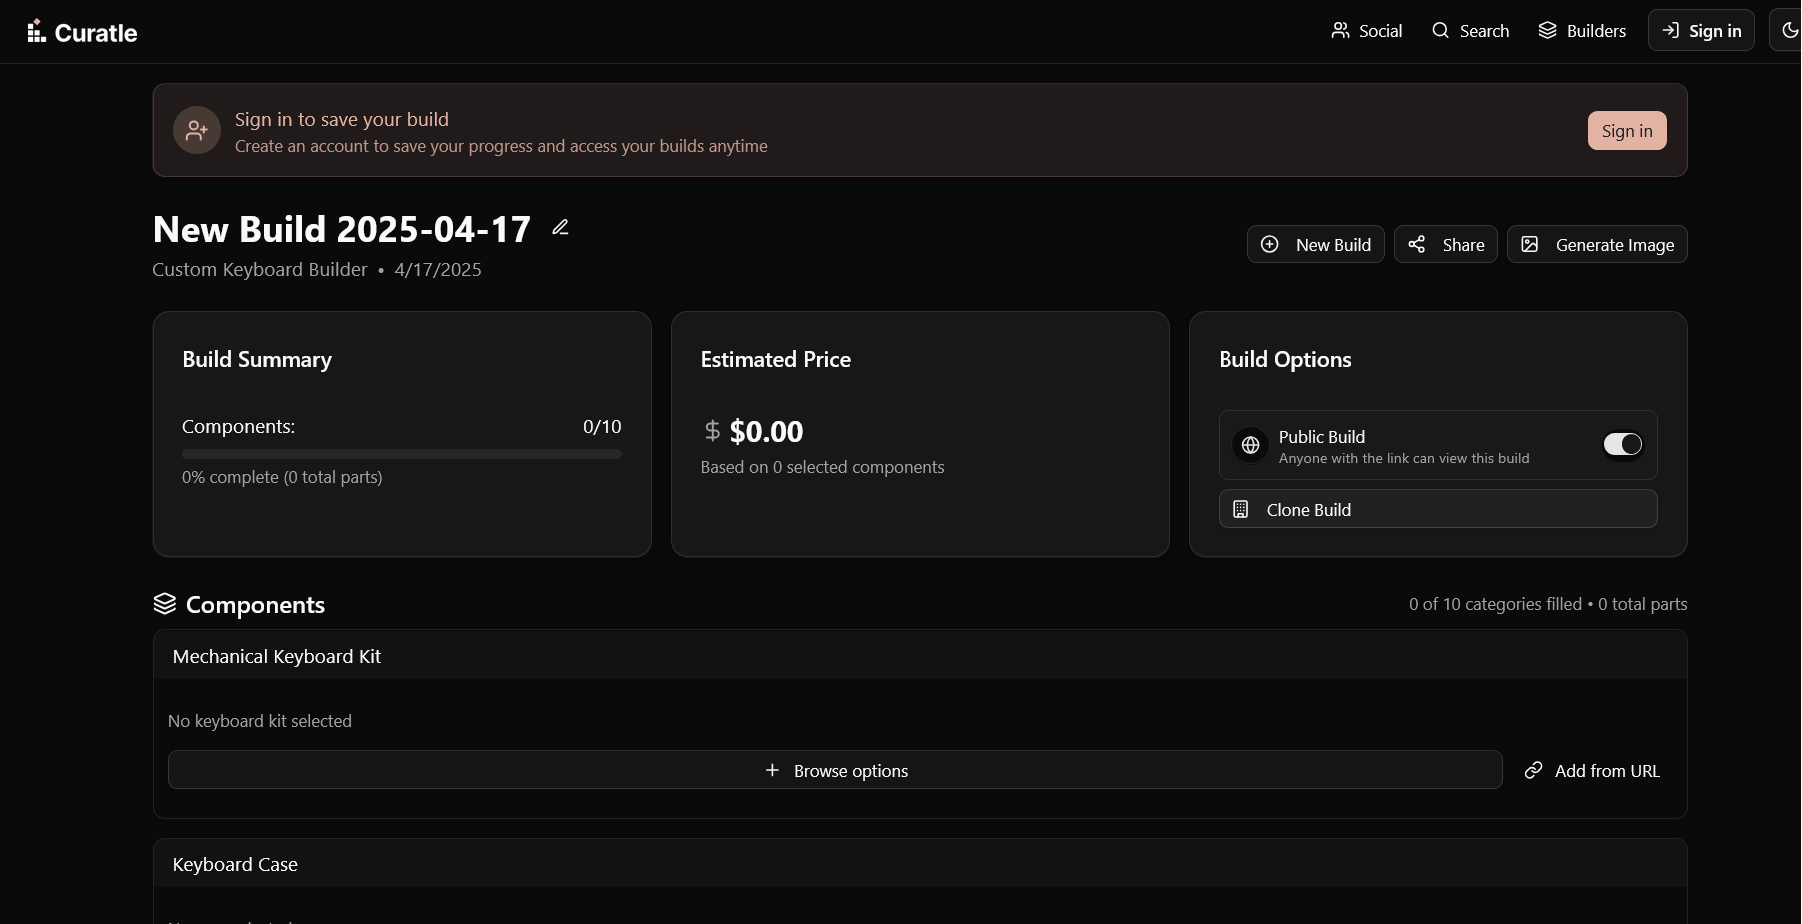
Finally, a Keyboard Part Picker
Can’t decide what kind of keyboard to build? Not even sure what all there is to consider? Then you can’t go wrong with Curatle, a keyboard part picker built by [Careless-Pay9337] to help separate you from your hard-earned money in itemized fashion.
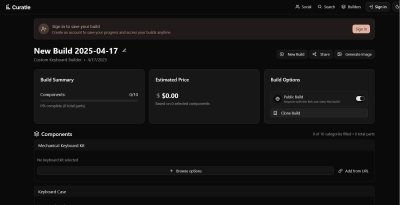
The start screen for Curatle made by [Careless-Pay9337].So this is basically PCPartPicker, but for keyboards, and those are [Careless-Pay9337]’s words. Essentially, [Careless-Pay9337] scraped a boatload of keyboard products from various vendors, so there is a lot to choose from already. But if that’s not enough, you can also import products from any store.
The only trouble is that currently, there’s no compatibility checking built in. It’ll be a long road, but it’s something that [Careless-Pay9337] does plan to implement in the future.
What else would you like to see? Be sure to let [Careless-Pay9337] know over in the reddit thread.
Got a hot tip that has like, anything to do with keyboards? [Help me out by sending in a link or two](mailto:tips@hackaday.com?Subject=[Keebin' with Kristina]). Don’t want all the Hackaday scribes to see it? Feel free to [email me directly](mailto:kristinapanos@hackaday.com?Subject=[Keebin' Fodder]).
From Blog – Hackaday via this RSS feed
Although the video game crash of the mid-80s caused a major decline in arcades from their peak popularity, the industry didn’t completely die off. In fact, there was a revival that lasted until the 90s with plenty of companies like Capcom, Midway, SEGA, and Konami all competing to get quarters, francs, loonies, yen, and other coins from around the world. During this time, Namco — another game company — built a colossal 28-player prototype shooter game. Eventually, they cut it down to a (still titanic) six-player game that was actually released to the world. [PhilWIP] and his associates are currently restoring one of the few remaining room-sized games that are still surviving.
The game is called Galaxian 3, with this particular one having been upgraded to a version called “Attack of the Zolgear”. Even though it’s “only” a six-person shooter, it’s still enormous in scale. The six players sit side-by-side in an enclosed room, each with their own controller. Two projectors handle the display, which is large even by modern standards, and a gauntlet of early-90s technology, including LaserDisc players, is responsible for all of the gameplay. When [PhilWIP] first arrived, the game actually powered on, but there were several problems to solve before it was playable. They also wanted to preserve the game, which meant imaging the LaserDiscs to copy their data onto modern storage. Some of the player input PCBs needed repairs, and there were several issues with the projectors. Eventually the team got the system working well enough to play.
[PhilWIP] and the others haven’t gotten all the issues ironed out yet. The hope is that subsequent trips will restore this 90s novelty to working order shortly. It turns out there were all kinds of unique hardware from this wild-west era that’s in need of restoring, as we saw a few years ago with this early 3D cabinet from the same era.
From Blog – Hackaday via this RSS feed
Over on his YouTube channel [Aaron Danner] explains biasing transistors with current sources in the 29th video of his Transistors Series. In this video, he shows how to replace a bias resistor (and consequently an additional capacitor) with a current source for both common-emitter and common-collector amplifiers.
A current source provides electrical energy with a constant current. The implication is that if the resistance of the load changes the current source will vary the voltage to compensate. In reality, this is exactly what you want. The usual resistor biasing arrangement just simulates this over a narrow voltage range, which is generally good enough, but not as good as a true current source.
As [Aaron] explains there are various advantages to biasing transistors with current sources instead of resistors, chief among them is that it allows you to get rid of a capacitor (capacitors are expensive to make in integrated circuits and often among the lowest-quality components in a design). You can also avoid losing some of your gain through the bias resistor.
The current source that [Aaron] uses in this video is known as a current mirror.
From Blog – Hackaday via this RSS feed
At Hackaday, it is always clock time, and clock time is a great time to check in with [shiura], whose 3D Printed Perpetual Calendar Clock is now at Version 2. A 3D printed calendar clock, well, no big deal, right? Grab a few steppers, slap in an ESP32 to connect to a time server, and you’re good. That’s where most of us would probably go, but most of us aren’t [shiura], who has some real mechanical chops.
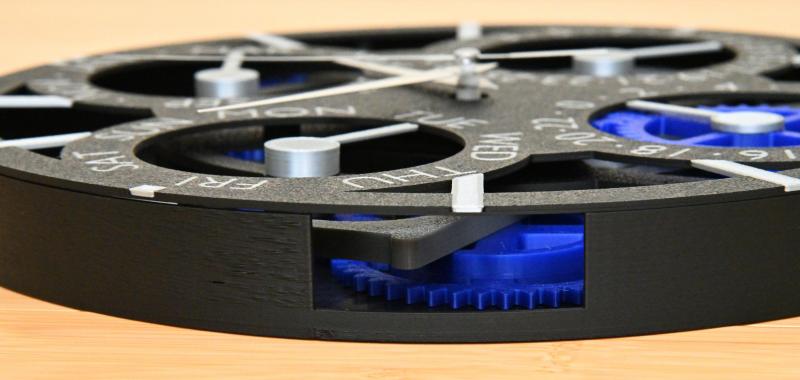
There’s also a 24-hour dial, because why not?
This clock isn’t all mechanical. It probably could be, but at its core it uses a commercial quartz movement — you know, the cheap ones that take a single double-A battery. The only restriction is that the length of the hour axis must be twelve millimeters or more. Aside from that, a few self-tapping screws and an M8 nut, everything else is fully 3D printed.
From that simple quartz movement, [shiura]’s clock tracks not only the day of the week, the month and date — even in Febuary, and even compensating for leap years. Except for the inevitable drift (and battery changes) you should not have to adjust this clock until March 2100, assuming both you and the 3D printed mechanism live that long. Version one actually did all this, too, but somehow we missed it; version two has some improvements to aesthetics and usability. Take a tour of the mechanism in the video after the break.
We’ve featured several of [shiura]’s innovative clocks before, from a hybrid mechanical-analog display, to a splitless flip-clock, and a fully analog hollow face clock. Of course [shiura] is hardly our only clock-making contributor, because it it always clock time at Hackaday.
From Blog – Hackaday via this RSS feed
Water is an excellent coolant, but the flip side is that it is also an excellent solvent. This, in short, is why any water cooling loop is also a prime candidate for an interesting introduction to the galvanic metal series, resulting in severe corrosion that commences immediately. In a recent video by [der8aer], this issue is demonstrated using a GPU cold plate. The part is made out of nickel-plated copper and features many small channels to increase surface area with the coolant.
The surface analysis of the sample cold plate after a brief exposure to distilled water shows the deposited copper atoms. (Credit: der8auer, YouTube)
Theoretically, if one were to use distilled water in a coolant loop that contains a single type of metal (like copper), there would be no issue. As [der8auer] points out, fittings, radiators, and the cooling block are nearly always made of various metals and alloys like brass, for example. This thus creates the setup for galvanic corrosion, whereby one metal acts as the anode and the other as a cathode. While this is desirable in batteries, for a cooling loop, this means that the water strips metal ions off the anode and deposits them on the cathode metal.
The nickel-plated cold plate should be immune to this if the plating were perfect. However, as demonstrated in the video, even a brief exposure to distilled water at 60°C induced strong galvanic corrosion. Analysis in an SEM showed that the imperfect nickel plating allowed copper ions to be dissolved into the water before being deposited on top of the nickel (cathode). In a comparison with another sample that had a coolant with corrosion inhibitor (DP Ultra) used, no such corrosion was observed, even after much longer exposure.
This DP Ultra coolant is mostly distilled water but has glycol added. The glycol improves the pH and coats surfaces to prevent galvanic corrosion. The other element is benzotriazole, which provides similar benefits. Of course, each corrosion inhibitor targets a specific environment, and there is also the issue with organic films forming, which may require biocides to be added. As usual, water cooling has more subtlety than you’d expect.
From Blog – Hackaday via this RSS feed
China played host to what, presumably, was the world’s first robot and human half-marathon. You can check out the action and the Tiangong Ultra robot that won in the video below. The event took place in Beijing and spanned 21.1 km. There was, however, a barrier between lanes for humans and machines.
The human rules were the same as you’d expect, but the robots did need a few concessions, such as battery swap stops. The winning ‘bot crossed the finish line in just over 160 minutes. However, there were awards for endurance, gait design, and design innovation.
Humans still took the top spots, though. We also noted that some of the robots had issues where they lost control or had other problems. Even the winner fell down once and had three battery changes over the course.
Of the 21 robots that started, only six made the finish line. We don’t know how many of the 12,000 humans finished, but we are pretty sure it was more than six, so we don’t think runners have to worry about robot overlords yet. But they’re getting better all the time.
From Blog – Hackaday via this RSS feed
We appear to be edging ever closer to a solid statement of “We are not alone” in the universe with this week’s announcement of the detection of biosignatures in the atmosphere of exoplanet K2-18b. The planet, which is 124 light-years away, has been the focus of much attention since it was discovered in 2015 using the Kepler space telescope because it lies in the habitable zone around its red-dwarf star. Initial observations with Hubble indicated the presence of water vapor, and follow-up investigations using the James Webb Space Telescope detected all sorts of goodies in the atmosphere, including carbon dioxide and methane. But more recently, JWST saw signs of dimethyl sulfide (DMS) and dimethyl disulfide (DMDS), organic molecules which, on Earth, are strongly associated with biological processes in marine bacteria and phytoplankton.
The team analyzing the JWST data says that the data is currently pretty good, with a statistical significance of 99.7%. That’s a three-sigma result, and while it’s promising, it’s not quite good enough to seal the deal that life evolved more than once in the universe. If further JWST observations manage to firm that up to five sigma, it’ll be the most important scientific result of all time. To our way of thinking, it would be much more significant than finding evidence of ancient or even current life in our solar system, since cross-contamination is so easy in the relatively cozy confines of the Sun’s gravity well. K2-18b is far enough away from our system as to make that virtually impossible, and that would say a lot about the universality of biochemical evolution. It could also provide an answer to the Fermi Paradox, since it could indicate that the galaxy is actually teeming with life but under conditions that make it difficult to evolve into species capable of making detectable techno-signatures. It’s hard to build a radio or a rocket when you live on a high-g water world, after all.
Closer to home, there’s speculation that the famous Antikythera mechanism may not have worked at all in its heyday. According to researchers from Universidad Nacional de Mar del Plata in Argentina, “the world’s first analog computer” could not have worked due to the accumulated mechanical error of its gears. They blame this on the shape of the gear teeth, which appear triangular on CT scans of the mechanism, and which they seem to attribute to manufacturing defects. Given the 20-odd centuries the brass-and-iron device spent at the bottom of the Aegean Sea and the potential for artifacts in CT scans, we’re not sure it’s safe to pin the suboptimal shape of the gear teeth on the maker of the mechanism. They also seem to call into question the ability of 1st-century BCE craftsmen to construct a mechanism with sufficient precision to serve as a useful astronomical calculator, a position that Chris from Clickspring has been putting the lie to with his ongoing effort to reproduce the Antikythera mechanism using ancient tools and materials. We’re keen to hear what he has to say about this issue.
Speaking of questionable scientific papers, have you heard about “vegetative electron microscopy”? It’s all the rage, having been mentioned in at least 22 scientific papers recently, even though no such technique exists. Or rather, it didn’t exist until around 2017, when it popped up in a couple of Iranian scientific papers. How it came into being is a bit of a mystery, but it may have started with faulty scans of a paper from the 1950s, which had the terms “vegetative” and “electron microscopy” printed in different columns but directly across from each other. That somehow led to the terms getting glued together, possibly in one of those Iranian papers because the Farsi spelling of “vegetative” is very similar to “scanning,” a much more sensible prefix to “electron microscopy.” Once the nonsense term was created, it propagated into subsequent papers of dubious scientific provenance by authors who didn’t bother to check their references, or perhaps never existed in the first place. The wonders of our AI world never cease to amaze.
And finally, from the heart of Silicon Valley comes a tale of cyber hijinks as several crosswalks were hacked to taunt everyone’s favorite billionaires. Twelve Palo Alto crosswalks were targeted by persons unknown, who somehow managed to gain access to the voice announcement system in the crosswalks and replaced the normally helpful voice messages with deep-fake audio of Elon Musk and Mark Zuckerberg saying ridiculous but plausible things. Redwood City and Menlo Park crosswalks may have also been attacked, and soulless city officials responded by disabling the voice feature. We get why they had to do it, but as cyberattacks go, this one seems pretty harmless.
From Blog – Hackaday via this RSS feed
Forth is popular on small computers because it is simple to implement, yet quite powerful. But what happens when you really need to shrink it? Well, if your target is the 6502, there’s milliForth-6502.
This is a port of milliForth, which is a fork of sectorforth. The sectorforth project set the standard, implementing a Forth so small it could fit in a 512-byte boot sector. The milliForth project took sectorforth and made it even smaller, weighing in at only 336 bytes. However, both milliForth and sectorforth are for the x86 architecture. With milliForth-6502, [Alvaro G. S. Barcellos] wanted to see how small he could make a 6502 implementation.
So how big is the milliForth-6502 binary? Our tests indicate: 1,110 bytes. It won’t quite fit in a boot sector, but it’s pretty small!
Most of the code for milliForth-6502 is assembly code in sector-6502.s. This code is compiled using tools from the cc65 project. To run the code lib6502 is used for 6502 emulation.
Emulation is all well and good as far as it goes, especially for development and testing, but we’d love to see this code running on a real 6502. Even better would be a 6502 built from scratch! If you get this code running we’d love to hear how it went!
From Blog – Hackaday via this RSS feed
Despite the best efforts of the RepRap community over the last twenty years, self-replicating 3D printers have remained a stubbornly elusive goal, largely due to the difficulty of printing electronics. [Brian Minnick]’s fully-printed 3D printer could eventually change that, and he’s already solved an impressive number of technical challenges in the process.[Brian]’s first step was to make a 3D-printable motor. Instead of the more conventional stepper motors, he designed a fully 3D-printed 3-pole brushed motor. The motor coils are made from solder paste, which the printer applies using a custom syringe-based extruder. The paste is then sintered at a moderate temperature, resulting in traces with a resistivity as low as 0.001 Ω mm, low enough to make effective magnetic coils.
Brushed motors are less accurate than stepper motors, but they do have a particularly useful advantage here: their speed can be controlled simply by varying the voltage. This enables a purely electromechanical control system – no microcontroller on this printer! A 3D-printed data strip encodes instructions for the printer as holes in a plastic sheet, which open and close simple switches in the motor controller. These switches control the speed, direction, and duration of the motors’ movement, letting the data strip encode motion vectors.Remarkably, the hotend on this printer is also 3D-printed. [Brian] took advantage of the fact that PEEK’s melting point increases by about 110 ℃ when it’s annealed, which should allow an annealed hotend to print itself. So far it’s only extruded PLA, but the idea seems sound. The video below the break shows a single-axis proof of concept in action. We haven’t been able to find any documentation of a fully-functional 3D printer, but nevertheless, it’s an impressive demonstration. We’ve covered similar printers before, and if you make progress in this area, be sure to send us a tip.
From Blog – Hackaday via this RSS feed
Entry-level oscilloscopes are a great way to get some low-cost instrumentation on a test bench, whether it’s for a garage lab or a schoolroom. But the cheapest ones are often cheap for a reason, and even though they work well for the price they won’t stand up to more advanced equipment. But missing features don’t have to stay missing forever, as it’s possible to augment them to get some of these features. [Tommy’s] project shows you one way to make a silk purse from a sow’s ear, at least as it relates to oscilloscopes.
Most of the problem with these lower-cost tools is their low precision due to fewer bits of analog-digital conversion. They also tend to be quite noisy, further lowering the quality of the oscilloscope. [Tommy] is focusing his efforts on the DSO138-mini, an oscilloscope with a bandwidth of 100 kHz and an effective resolution of 10 bits. The first step is to add an anti-aliasing filter to the input, which is essentially a low-pass filter that removes high frequency components of the signal, which could cause a problem due to the lower resolution of the device. After that, digital post-processing is done on the output, which removes noise caused by the system’s power supply, among other things, and essentially acts as a second low-pass filter.
In part 2 of the project, [Tommy] demonstrates the effectiveness of these two methods with experimental data, showing that a good percentage of the noise on a test signal has been removed from the output. All the more impressive here is that the only additional cost besides the inexpensive oscilloscope itself is for a ceramic capacitor that costs around a dollar. We were also impressed: [Tommy] is a junior in high school!
Presumably, you could apply these techniques to other inexpensive equipment, like this even cheaper oscilloscope based on the ESP32.
From Blog – Hackaday via this RSS feed
In this series of 23 YouTube videos [Rich] puts the AMD Zynq-7000 SoC through its paces by building a development board from the ground up to host it along with its peripherals. The Zynq is part FPGA and part CPU, and while it has been around for a while, we don’t see nearly as many projects about it as we’d like.
Rich covers everything from the power system to HDMI, USB, DDR RAM, and everything in between. By the end, he’s able to boot PetaLinux.
The Zynq SoC includes an ARM Cortex-A9 Based APU and an Artix-7 FPGA (or a Kintex-7 FPGA on higher models). In case you missed it, Xilinx was recently acquired by AMD, which is why you might have remembered this as a Xilinx part.
We’ve heard from [Rich] before. Back in 2021 we saw his Arduino Brings USB Mouse To Homebrew Computer. Don’t miss his follow-up playlist: Building on my Zynq-7000 in which he takes his Zynq-7000 board even further.
If you’re interested in FPGA technology but need something more easy going to get you started, be sure to check out how to build a 6809 CPU on an FPGA. Or, if you need something even simpler, report for boot camp.
Thanks to [Alex] for the tip!
From Blog – Hackaday via this RSS feed
When we say non-planar slicing is for the birds, we mean [Joshua Bird], who demonstrates the versatility of his new non-planar S4-Slicer by printing a Benchy upside down with the “Core R-Theta” printer we have featured here before.
S4 slicer uses the path from any point (here, Benchy’s prow) as its basis…
This non-planar slicer is built into a Jupyter notebook, which follows a relatively simple algorithm to automatically generate non-planar toolpaths for any model. It does this by first generating a tetrahedral mesh of the model and then calculating the shortest possible path through the model from any given tetrahedron to the print bed. Even with non-planar printing, you need to print from the print-bed up (or out).
Quite a lot of math is done to use these paths to calculate a deformation mesh, and we’ll leave that to [Joshua] to explain in his video below. After applying the deformation, he slices the resulting mesh in Cura, before the G-code goes back to Jupyter to be re-transformed, restoring the shape of the original mesh.
… to generate deformed models for slicing, like this.
So yes, it is G-code bending as others have demonstrated before, but in a reproducible, streamlined, and straightforward workflow. Indeed, [Josh] credits much of the work to earlier work on the S^3-Slicer, which inspired much of the logic and the name behind his S4 slicer. (Not S4 as in “more than S^3” but S4 as a contraction of “Simplified S^3”). Once again, open source allows for incremental innovation.
It is admittedly a computationally intensive process, and [Joshua] uses a simplified model of Benchy for this demo. This seems exactly the sort of thing we’d like to burn compute power on, though.
This sort of non-planar 3D printing is an exciting frontier, one which we have covered before. We’ve seen techniques for non-planar infill, or even to print overhangs on unmodified Cartesian printers, but this is probably the first time we’ve seen Benchy given the non-planar treatment. You can try S4 slicer for yourself via GitHub, or just watch the non-planar magic in action after the break.
From Blog – Hackaday via this RSS feed
It’s traditional to launch new software on April Fool’s Day, which is when we heard that Rockbox 4.0 has been released. But, in this case, the venerable MP3 firmware actually did update after a long absence. It’s great to see that good old Rockbox is still kicking along. We first mentioned Rockbox here at Hackaday approaching 20 years ago. How time flies. There used to be a whole ‘scene’ around hacking Personal Media Players (PMPs), also known as “MP3 Players”.
We tracked down Rockbox contributor [Solomon Peachy] to ask for some simple advice: If someone wants to install Rockbox on a personal media player today, what hardware should they buy? [Solomon] referred us to the AIGO EROS Q / EROS K, which is the only compatible hardware still being manufactured and sold. Beyond that, if you want to buy compatible hardware, you’ll need to find some secondhand somewhere, such as eBay. See the Rockbox Wiki for supported hardware.
Smartphones and streaming services have subsumed the single-purpose personal media player. Will you put the new Rockbox on something? Let us know in the comments.
From Blog – Hackaday via this RSS feed
The user interface of things we deal with often makes or breaks our enjoyment of using a device. [Janne] from Fraktal thinks so, he has an espresso machine he enjoys but the default controls were not what he was looking for and so in true hacker fashion he took what was and made it his own.
This Kickstarter-born Flair 58 is a manual espresso machine with minimal moving parts and no electronics in its default configuration. An optional preheater was available, but it felt like an afterthought. He decided to add a bit more finesse into his solution, with a sleek touchscreen display controlling a custom heater board with closed-loop temperature control, and provisions to connect an external scale scale for precise pour measurements. We’ve seen coffee maker hacks before, but this one certainly stands out for adding features absent from the machine’s initial design.
To accommodate the two custom PCBs and the touchscreen, [Janne] modified the machine’s frame. The Flair 58’s swooping curves posed a challenge, but instead of using an external enclosure, he shaped the PCBs to fit seamlessly within the machine’s structure. A wonderfully done hack given the open, exposed design of the base hardware.
Certainly head over to his site and check out this beautiful solution to improving on an existing device, and check out his other cool project based around laser fault injection. All the hardware and software for this project is freely available over on his site so if you’d like to upgrade your machine be sure to go check it out.
From Blog – Hackaday via this RSS feed
Although uranium-235 is the typical fuel for commercial fission reactors on account of it being fissile, it’s relatively rare relative to the fertile U-238 and thorium (Th-232). Using either of these fertile isotopes to breed new fuel from is thus an attractive proposition. Despite this, only India and China have a strong focus on using Th-232 for reactors, the former using breeders (Th-232 to U-233) to create fertile uranium fuel. China has demonstrated its approach — including refueling a live reactor — using a fourth-generation molten salt reactor.
The original research comes from US scientists in the 1960s. While there were tests in the MSRE reactor, no follow-up studies were funded. The concept languished until recently, with Terrestrial Energy’s Integral MSR and construction on China’s 2 MW TMSR-LF1 experimental reactor commencing in 2018 before first criticality in 2023. One major advantage of an MSR with liquid fuel (the -LF part in the name) is that it can filter out contaminants and add fresh fuel while the reactor is running. With this successful demonstration, along with the breeding of uranium fuel from thorium last year, a larger, 10 MW design can now be tested.
Since TMSR doesn’t need cooling water, it is perfect for use in arid areas. In addition, China is working on using a TMSR-derived design in nuclear-powered container vessels. With enough thorium around for tens of thousands of years, these low-maintenance MSR designs could soon power much of modern society, along with high-temperature pebble bed reactors, which is another concept that China has recently managed to make work with the HTR-PM design.
Meanwhile, reactors are getting smaller in general.
From Blog – Hackaday via this RSS feed
What do you do with an unused nuclear reactor project? In Washington, one of them was hacked to remove sound, all in the name of science.
In 1977, a little way outside of Seattle, Washington Nuclear Projects 3 and 5 (WNP-3 and WNP-5) were started as part of Washington Public Power Supply System (WPPSS, pronounced “whoops”). They ran over budget, and in the 80s they were mothballed even though WNP-3 was nearly complete.
In 2010 when [Ron] and [Bonnie Sauro] were starting their new acoustical lab, NWAA Labs, they thought they wanted to build in a mountain, but what they found was an auxiliary reactor building. The structure was attached to a defunct nuclear power facility. With concrete and rebar walls five feet thick, it was the ideal site for their acoustical experiments and tests.
There are strict facility requirements from standards bodies such as American National Standards Institute (ANSI) and the International Organization for Standardization (ISO) for acoustical labs which help ensure that different labs achieve comparable results. For example, you need stable temperature, humidity, and reverberation. The temperature within the facility is a stable 54 degrees Fahrenheit (12 degrees Celsius) regardless of the temperature outside.
Companies use acoustical labs to inform their designs and ensure that they meet acoustic standards or requirements, particularly those related to noise emissions. Over the last fifteen years, NWAA Labs has tested carpet samples, noise-cancelling headphones, sound-dampening construction materials, noisy washing machines, and even an airplane’s crew cabin!
If there was any question about whether [Ron Sauro] qualifies as a hacker, this quote removes all doubt: “I’m a carpenter, a plumber, a welder, I can fix a car,” he says. “Anything that needs to be done, I can do. Because I have to.”
Maybe we should send a wearable cone of silence to [Ron] for a complete test. If you’ve ever hacked a nuclear power plant, do let us know in the comments!
From Blog – Hackaday via this RSS feed
[CovaConcepts], who has a background in motorsports, has been busy designing an unconventional radio-controlled watercraft she calls the HydraJet.
There are two key design decisions that make the HydraJet what it is. First, she chose to propel the boat by pushing against the air via an electric ducted fan (EDF) rather than the water via a traditional water propeller. This simplified construction and made it more affordable, partly because she already had the fan on hand.
Her other design choice was to use wings underneath the boat to lift it out of the water. Not as hydrofoils, where the wings ride below the surface of the water, but for hydroplaning where the wings ride on the surface of the water. Lifting the vehicle out of the water, of course, reduces drag, improving performance as we’ve often seen with high speed watercraft (including RC models) as well as slower bicycle-powered ones. The choice to rely on hydroplaning also reduces the complexity of the design. Certain hydrofoil designs need to make adjustments in order to keep the vehicle at a steady level, whereas a hydroplaning wings can use a static angle. Hydrofoils also must overcome challenges to maintain stability.
[CovaConcepts] hopes to eventually scale the HydraJet up large enough to carry human passengers and we’re looking forward to the opportunity to take it for a spin around the lake.
Thanks to [John Little] for the tip!
From Blog – Hackaday via this RSS feed
This week, the hackerverse was full of “vibe coding”. If you’re not caught up on your AI buzzwords, this is the catchy name coined by [Andrej Karpathy] that refers to basically just YOLOing it with AI coding assistants. It’s the AI-fueled version of typing in what you want to StackOverflow and picking the top answers. Only, with the current state of LLMs, it’ll probably work after a while of iterating back and forth with the machine.
It’s a tempting vision, and it probably works for a lot of simple applications, in popular languages, or generally where the ground is already well trodden. And where the stakes are low, as [Al Williams] pointed out while we were talking about vibing on the podcast. Can you imagine vibe-coded ATM software that probably gives you the right amount of money? Vibe-coding automotive ECU software?
While vibe coding seems very liberating and hands-off, it really just changes the burden of doing the coding yourself into making sure that the LLM is giving you what you want, and when it doesn’t, refining your prompts until it does. It’s more like editing and auditing code than authoring it. And while we have no doubt that a stellar programmer like [Karpathy] can verify that he’s getting what he wants, write the correct unit tests, and so on, we’re not sure it’s the panacea that is being proclaimed for folks who don’t already know how to code.
Vibe coding should probably be reserved for people who already are expert coders, and for trivial projects. Just the way you wouldn’t let grade-school kids use calculators until they’ve mastered the basics of math by themselves, you shouldn’t let junior programmers vibe code: It simultaneously demands too much knowledge to corral the LLM, while side-stepping any of the learning that would come from doing it yourself.
And then there’s the security side of vibe coding, which opens up a whole attack surface. If the LLM isn’t up to industry standards on simple things like input sanitization, your vibed code probably shouldn’t be anywhere near the Internet.
So should you be vibing? Sure! If you feel competent overseeing what [Dan] described as “the worst summer intern ever”, and the states are low, then it’s absolutely a fun way to kick the tires and see what the tools are capable of. Just go into it all with reasonable expectations.
This article is part of the Hackaday.com newsletter, delivered every seven days for each of the last 200+ weeks. It also includes our favorite articles from the last seven days that you can see on the web version of the newsletter. Want this type of article to hit your inbox every Friday morning? You should sign up!
From Blog – Hackaday via this RSS feed
Will a 486 run Crysis? No, of course not. Will it run a large language model (LLM)? Given the huge buildout of compute power to do just that, many people would scoff at the very notion. But [Yeo Kheng Meng] is not many people.
He has set up various DOS computers to run a stripped down version of the Llama 2 LLM, originally from Meta. More specifically, [Yeo Kheng Meng] is implementing [Andreq Karpathy]’s Llama2.c library, which we have seen here before, running on Windows 98.
Llama2.c is a wonderful bit of programming that lets one inference a trained Llama2 model in only seven hundred lines of C. It it is seven hundred lines of modern C, however, so porting to DOS 6.22 and the outdated i386 architecture took some doing. [Yeo Kheng Meng] documents that work, and benchmarks a few retrocomputers. As painful as it may be to say — yes, a 486 or a Pentium 1 can now be counted as “retro”.
The models are not large, of course, with TinyStories-trained 260 kB model churning out a blistering 2.08 tokens per second on a generic 486 box. Newer machines can run larger models faster, of course. Ironically a Pentium M Thinkpad T24 (was that really 21 years ago?) is able to run a larger 110 Mb model faster than [Yeo Kheng Meng]’s modern Ryzen 5 desktop. Not because the Pentium M is going blazing fast, mind you, but because a memory allocation error prevented that model from running on the modern CPU. Slow and steady finishes the race, it seems.
This port will run on any 32-bit i386 hardware, which leaves the 16-bit regime as the next challenge. If one of you can get an Llama 2 hosted locally on an 286 or a 68000-based machine, then we may have to stop asking “Does it run DOOM?” and start asking “Will it run an LLM?”
From Blog – Hackaday via this RSS feed
While ham radio operators have been embracing digital mobile radio (DMR), the equipment is most often bought since — at least in early incarnations — it needs a proprietary CODEC to convert speech to digital and vice versa. But [QRadioLink] decided to tackle a homebrew and open source DMR modem.
The setup uses a LimeSDR, GNU Radio, and Codec2. There are some other open DMR projects, such as OpenRTX. So we are hopeful there are going to be more choices. The DMR modem, however, is only a proof-of-concept and reuses the MMDVMHost code to do the data link layer.
[QRadioLink] found several receiver implementations available, but only one other DMR transmitter — actually, a transceiver. Rather than use an AMBE hardware device or the potentially encumbered mbelib codec, the project uses Codec2 which is entirely open source.
There’s a lot of explanation about the data collection to prepare for the project, and then a deep dive into the nuts and bolts of the implementation. You might enjoy the video below to see things in action.
If you just want to listen to DMR, it’s easy. If Codec2 sounds familiar, it is part of M17.
From Blog – Hackaday via this RSS feed
Back in the olden days, there existed physical game stores, which in addition to physical games would also have kiosks where you could try out the current game consoles and handhelds. Generally these kiosks held the console, a display and any controllers if needed. After a while these kiosks would get scrapped, with only a very few ending up being rescued and restored. One of the lucky ones is a Game Boy kiosk, which [The Retro Future] managed to snag after it was found in a construction site. Sadly the thing was in a very rough condition, with the particle board especially being mostly destroyed.
Display model Game Boy, safely secured into the demo kiosk. (Credit: The Retro Future, YouTube)
These Game Boy kiosks also featured a special Game Boy, which – despite being super rare – also was hunted down. This led to the restoration, which included recovering as much of the original particle board as possible, with a professional furniture restore ([Don]) lending his expertise. This provides a master class in how to patch up damaged particle board, as maligned as this wood-dust-and-glue material is.
The boards were then reassembled more securely than the wood screws used by the person who had found the destroyed kiosk, in a way that allows for easy disassembly if needed. Fortunately most of the plastic pieces were still intact, and the Game Boy grey paint was easily matched. Next was reproducing a missing piece of art work, with fortunately existing versions available as reference. For a few missing metal bits that held the special Game Boy in place another kiosk was used to provide measurements.
After all this, the kiosk was powered back on, and it was like 1990 was back once again, just in time for playing Tetris on a dim, green-and-black screen while hunched half into the kiosk at the game store.
From Blog – Hackaday via this RSS feed
NASA astronaut Catherine Coleman gives ESA astronaut Paolo Nespoli a haircut in the Kibo laboratory on the ISS in 2011. (Credit: NASA)
Although we tend to see mostly the glorious and fun parts of hanging out in a space station, the human body will not cease to do its usual things, whether it involves the digestive system, or even something as mundane as the hair that sprouts from our heads. After all, we do not want our astronauts to return to Earth after a half-year stay in the ISS looking as if they got marooned on an uninhabited island. Introducing the onboard barbershop on the ISS, and the engineering behind making sure that after a decade the ISS doesn’t positively look like it got the 1970s shaggy wall carpet treatment.
The basic solution is rather straightforward: an electric hair clipper attached to a vacuum that will whisk the clippings safely into a container rather than being allowed to drift around. In a way this is similar to the vacuums you find on routers and saws in a woodworking shop, just with more keratin rather than cellulose and lignin.
On the Chinese Tiangong space station they use a similar approach, with the video showing how simple the system is, little more than a small handheld vacuum cleaner attached to the clippers. Naturally, you cannot just tape the vacuum cleaner to some clippers and expect it to get most of the clippings, which is where both the ISS and Tiangong solutions seems to have a carefully designed construction to maximize the hair removal. You can see the ISS system in action in this 2019 video from the Canadian Space Agency.
Of course, this system is not perfect, but amidst the kilograms of shed skin particles from the crew, a few small hair clippings can likely be handled by the ISS’ air treatment systems just fine. The goal after all is to not have a massive expanding cloud of hair clippings filling up the space station.
From Blog – Hackaday via this RSS feed
How far can you stretch a measuring tape before it buckles? The answer probably depends more on the tape than the user, but it does show how sturdy the coiled spring steel rulers can be. [Gengzhi He et. al.] may have been playing that game in the lab at UC San Diego when they hit upon the idea for a new kind of low-cost robotic gripper.
Four motors, four strips of measuring tape (doubled up)– one robot hand.
With the lovely backronym “GRIP-tape” — standing for Grasping and Rolling in Plane — you get a sense for what this effector can do. Its two “fingers” are each made of loops of doubled-up measuring tape bound together with what looks suspiciously like duck tape. With four motors total, the fingers can be lengthened or shortened by spooling the tape, allowing a reaching motion, pivot closer or further apart for grasping, and move-in-place like conveyor belts, rotating the object in their grasp.
The combination means it can reach out, grab a light bulb, and screw it into a socket. Or open and decant a jar of spices. Another video shows the gripper reaching out to pick a lemon, and gently twist it off the tree. It’s quite a performance for a device with such modest components.
At the moment, the gripper is controlled via remote; the researchers plan on adding sensors and AI autonomous control. Read all the details in the preprint, or check below the fold to watch the robot in action.
This is hardly the first time we’ve highlighted a grabby robot. We’ve seen belts, we’ve seen origami — but this is the first time we’ve seen a measuring tape. Have you seen a cool robot? Toss us a tip. We’d love to hear from you.
Tip of the hat to reader [anonymouse] for pointing this one out.
From Blog – Hackaday via this RSS feed
Although there are plenty of methods for effectively imaging a 3D space, LiDAR is widely regarded as one of the most effective methods. These systems use a rapid succession of laser pulses over a wide area to create an accurate 3D map. Early LiDAR systems were cumbersome and expensive but as the march of time continues on, these systems have become much more accessible to the average person. So much so that you can quickly attach one to a Raspberry Pi and perform LiDAR imaging for a very reasonable cost.
This software suite is a custom serial driver and scanning system for the Raspberry Pi, designed to work with LDRobot LiDAR modules like the LD06, LD19, and STL27L. Although still in active development, it offers an impressive set of features: real-time 2D visualizations, vertex color extraction, generation of 360-degree panoramic maps using fisheye camera images, and export capabilities for integration with other tools. The hardware setup includes a stepper motor for quick full-area scanning, and power options that include either a USB battery bank or a pair of 18650 lithium cells—making the system portable and self-contained during scans.
LiDAR systems are quickly becoming a dominant player for anything needing to map out or navigate a complex 3D space, from self-driving cars to small Arduino-powered robots. The capabilities a system like this brings are substantial for a reasonable cost, and we expect to see more LiDAR modules in other hardware as the technology matures further.
Thanks to [Dirk] for the tip!
From Blog – Hackaday via this RSS feed
Hackaday
Fresh hacks every day